Printable Event Tickets: 2026 Design, Printing & Branding Guide
Planning a concert, fundraiser, school program, gala, community event, dinner, or corporate gathering? Printable event tickets give you a simple way to provide admission details, reinforce your event identity, and give attendees something they can actually hold onto.
A good ticket needs to do more than look attractive. It should make the event details easy to find, fit your branding, print cleanly, and work with the way you plan to check people in. For fundraisers, a ticket may also need numbering, a perforated stub, or space for purchaser information.
This guide explains how to design printable event tickets, what information to include, how physical and digital tickets compare, and when DIY printing or professional printing makes more sense.
What Are Printable Event Tickets?
Printable event tickets are physical tickets that can be printed on paper or cardstock and distributed to attendees before or during an event. They can function as admission passes, keepsakes, raffle entries, check-in records, or a combination of these purposes.
The design should reflect what the ticket actually needs to accomplish.
For a basic admission event, the ticket may simply need the event name, date, time, venue, price, and admission information. A fundraiser may need additional details such as organization information, ticket numbers, a tear-off stub, or drawing information.
The most important distinction is this:
An admission ticket grants access to an event. A raffle ticket gives someone a chance to win a prize.
Those purposes can sometimes be combined, but they should not be treated as the same type of ticket.
If your event includes fundraising, start by deciding whether you need admission tickets, raffle tickets, or both. If you’re planning a fundraising event, our guide to fundraising tickets can help you understand the different ticket options and how they can fit into your campaign.
What Should You Put on an Event Ticket?
A well-designed ticket should answer the attendee’s most important questions without making them search through a crowded layout.
At minimum, consider including:
| Ticket Element | Why It Matters |
| Event name | Identifies the event immediately |
| Date | Tells attendees when to attend |
| Start time | Reduces confusion at the door |
| Venue | Provides the location |
| Admission information | Clarifies who or what the ticket admits |
| Ticket price | Shows what was paid or what the ticket costs |
| Seat or section | Important for assigned seating |
| Ticket number | Useful for tracking and certain fundraising formats |
| Organization name/logo | Builds recognition and trust |
| Website/contact information | Gives attendees a way to find updates |
| Special instructions | Helps communicate parking, check-in, dress code, or entry details |
For a fundraiser, the ticket may also need numbering, a perforated stub, or additional information for the drawing.
Before finalizing your layout, it can help to review real-world raffle ticket samples for ideas about ticket proportions, numbering, typography, and information placement.
What Information Should Go on Printable Event Tickets?
For most events, printable event tickets should clearly display the event name, date, time, location, admission information, and any details attendees need at check-in.
For assigned-seat events, include the seat, section, or table information. For fundraising events involving drawings, use numbering and a stub when appropriate.
Keep the most important information visually prominent and avoid filling every available space with small text.
Printable Event Tickets vs. Digital Event Tickets
Physical tickets aren’t the only option. Many organizers now use digital event tickets delivered by email, mobile wallet, registration platform, or event-management software.
The right format depends on the event.
| Feature | Printable Tickets | Digital Tickets |
| Physical keepsake | Yes | No |
| Works without a phone | Yes | Usually no |
| Easy to distribute in advance | Yes | Yes |
| Branding opportunities | Strong | Strong |
| QR codes | Optional | Common |
| Sequential numbering | Easy to include | Usually handled digitally |
| Perforated stub | Possible | No |
| Home printing | Yes | Not applicable |
| Mobile check-in | No | Yes |
| Useful for fundraising | Very useful for some formats | Useful for online sales |
When Should You Use Digital Event Tickets?
Digital tickets are particularly useful when attendees purchase online and check in electronically. They can reduce physical handling and make distribution fast.
Physical tickets still have advantages when attendees buy in person, when volunteers need a simple paper check-in system, when the ticket doubles as a keepsake, or when a fundraiser relies on numbered and perforated tickets.
A hybrid system can also work. For example, attendees might register online while your organization uses printed tickets for an on-site fundraiser or drawing.
The key is to choose the format based on the event workflow rather than choosing a ticket type simply because it is currently popular.
9 Event Ticket Design Ideas for 2026
Modern tickets do not need complicated graphics to look professional. Strong hierarchy, readable information, and consistent branding usually matter more than decorative effects.
1. Use a Minimalist Layout
A clean ticket can make important information easier to find.
Use:
- One primary headline
- A limited font selection
- Plenty of whitespace
- Clear information groups
- Strong contrast
Minimalist layouts work especially well for corporate events, conferences, fundraising dinners, and professional organizations.
2. Make the Event Name the Visual Anchor
Someone looking at the ticket should immediately understand what event it represents.
Make the event name prominent rather than hiding it beneath decorative graphics.
3. Match the Event’s Color Palette
Your ticket should feel connected to your other event branding.
Use the same or complementary colors found on:
- Invitations
- Flyers
- Event websites
- Social media graphics
- Programs
- Event signage
- Sponsor materials
This is where corporate event branding becomes especially useful. A ticket can function as one small piece of a larger visual identity.
4. Use Strong Typography
Typography can establish the mood of an event without overwhelming the information.
A formal gala might use elegant typography, while a school festival or sports fundraiser can use something more energetic.
Regardless of style, readability comes first.
5. Create a Strong Information Hierarchy
Not every piece of information deserves the same visual weight.
A useful hierarchy might be:
Event name → date/time → venue → admission details → ticket number → additional information
This allows attendees to scan the ticket quickly.
6. Turn the Ticket Into a Keepsake
For some events, the ticket becomes part of the memory of attending.
Concerts, anniversary celebrations, festivals, alumni events, charity galas, and special community events can benefit from a distinctive design that attendees may want to save.
7. Add a Tear-Off Stub When It Serves a Purpose
A perforated stub is useful when you need to separate admission information from a portion collected at check-in.
It can also be useful for certain fundraising formats where the purchaser keeps one portion and the organization retains the other.
If your project needs a different format for fundraising, review the available raffle ticket books to see how booklets can be used for organized ticket distribution.
8. Use Numbering for Better Organization
Sequential ticket numbers can make physical ticket distribution easier to manage.
Numbering is especially important for raffle tickets, where each entry needs to be distinguishable during the drawing.
9. Leave Room for Sponsors
If sponsors help fund your event, the ticket can provide another place to recognize them.
Instead of covering the ticket with logos, create a dedicated sponsor area that is visually separate from the main event information.
How to Design Printable Event Tickets Step by Step
Creating effective printable event tickets is easier when you plan the information before worrying about colors and graphics.
Step 1: Define the Ticket’s Purpose
Ask:
- Is this an admission ticket?
- Is it a raffle ticket?
- Does it do both?
- Does it need a stub?
- Does it need a unique number?
- Will attendees need seat information?
The answers determine the layout.
Step 2: Gather All Required Information
Create a checklist before opening your design software.
Include the event name, date, time, location, price, organization information, website, contact information, seating details, instructions, and any applicable terms.
Step 3: Choose Your Format
Decide whether the ticket will be:
- Standard admission ticket
- Wide-format ticket
- Numbered raffle ticket
- Perforated ticket
- Ticket booklet
- Digital ticket
- Hybrid physical/digital ticket
If you are specifically creating raffle tickets, review the available raffle ticket templates before creating the final artwork. Templates can help you position artwork correctly around ticket dimensions, numbering, and perforations.
Step 4: Build the Layout Before Adding Decoration
Start with the information hierarchy.
Place the event name and essential details first. Then add branding elements, images, patterns, or decorative features.
This prevents the common mistake of designing around graphics and trying to squeeze the important information into the remaining space.
Step 5: Check Print Requirements
Before printing, confirm:
- Finished ticket dimensions
- Margins
- Safe areas
- Image resolution
- Text size
- Color settings
- Bleed requirements if applicable
- Perforation location
- Numbering location
- Final PDF dimensions
Using the correct template is particularly important for professionally printed tickets because artwork must fit the physical production specifications.
Step 6: Proof the Ticket
Never assume a design is correct simply because it looks good on your monitor.
Check the event name, date, time, venue, price, spelling, phone number, website, ticket numbers, and sponsor names.
Then have another person review it.
A fresh set of eyes can catch errors the original designer has become accustomed to overlooking.
Step 7: Print a Test Copy
Print one physical ticket before producing the full quantity.
Check the actual printed size and readability. Confirm that the colors, margins, text, numbering, and perforation area look right on paper.
Step 8: Produce and Organize the Final Tickets
Once approved, print the required quantity and organize the tickets in the same way they will be sold or distributed.
For larger fundraisers, professional printing can reduce the manual work involved in numbering, cutting, perforating, and organizing hundreds or thousands of tickets.
How Corporate Event Branding Improves Ticket Design
Corporate event branding is more than placing a company logo at the top of a ticket.
A strong branded ticket should feel like part of the same visual system as the rest of the event.
A consistent event identity can extend across:
- Brand colors
- Logo treatment
- Typography
- Photography style
- Messaging
- Sponsor presentation
- Visual spacing
This creates consistency across your event branding materials.
Your ticket, invitation, event website, signage, program, name badges, and social graphics do not need to look identical. They should, however, feel like they belong to the same event.
How to Build a Branded Ticket Without Overdesigning It
Start with your brand’s existing visual elements.
Then select one primary visual feature for the ticket. This could be a color block, photograph, illustration, pattern, or bold typographic treatment.
Avoid adding five different visual effects simply because the design software makes them available.
A professional ticket usually benefits more from consistency than complexity.
If you need inspiration for a custom fundraising ticket, explore our guide to custom raffle ticket design before preparing your artwork.
Choosing the Right Ticket Size and Format
Size affects both design and usability.
A small ticket may be ideal when you only need basic admission information. A larger format gives you more room for detailed instructions, sponsor recognition, or additional information.
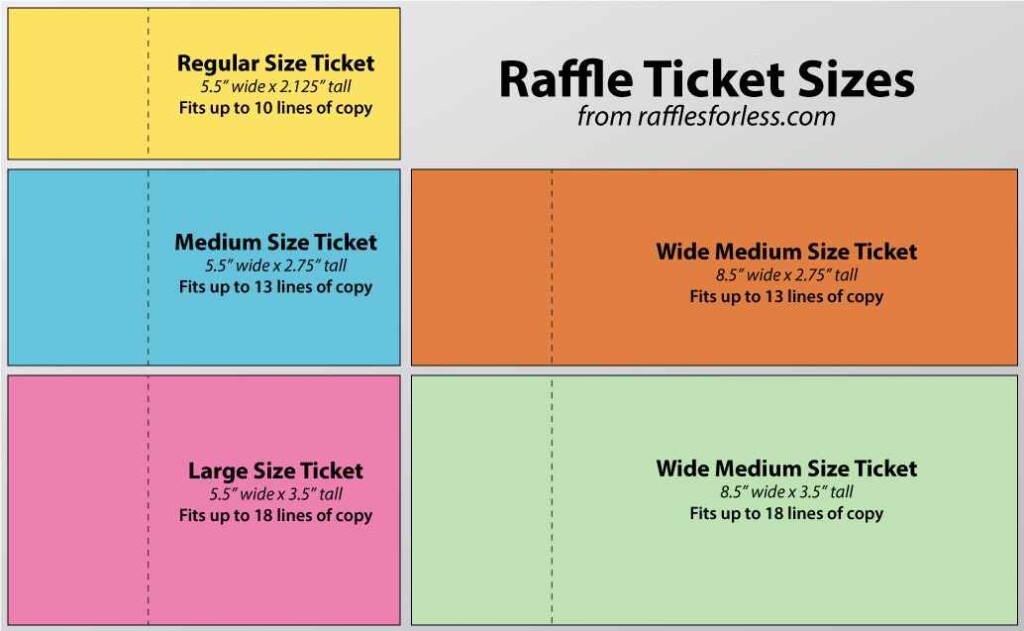
For raffle-related tickets, Raffles For Less currently offers several primary ticket formats:
| Format | Size |
| Regular | 2-1/8 × 5-1/2 inches |
| Medium | 2-3/4 × 5-1/2 inches |
| Large | 3-1/2 × 5-1/2 inches |
| Wide Medium | 2-3/4 × 8-1/2 inches |
| Wide Large | 3-1/2 × 8-1/2 inches |
If you are unsure which format works for your design, compare raffle ticket samples before creating the final artwork.
The templates also help show where perforations and numbering are positioned.
DIY Printing vs. Professional Printing
There is no single answer for every event.
| Consideration | DIY Printing | Professional Printing |
| Small quantity | Often practical | May still work |
| Large quantity | More labor | More efficient |
| Design control | Very high | High |
| Numbering | Requires setup | Easier |
| Perforation | Requires equipment or perforated stock | Professionally finished |
| Cutting | Manual | Handled during production |
| Consistency | Depends on equipment | More consistent |
| Time required | Higher | Lower |
| Customization | High | High |
When DIY Printing Makes Sense
DIY can be a good option when you need a small quantity, already have a suitable printer, have time to prepare the tickets, and do not require complicated finishing.
For a few dozen simple tickets, printing at home may be perfectly reasonable.
If you are making raffle tickets yourself, you can also review the how to make raffle tickets guide for additional options.
When Professional Printing Makes More Sense
Professional printing becomes more attractive when you need hundreds or thousands of tickets, sequential numbering, perforated stubs, consistent production, or a tight deadline.
Raffles For Less offers custom printed raffle tickets with multiple sizes and customization options for fundraising organizations.
Before ordering, compare the available raffle ticket pricing so you can estimate the cost for your required quantity and format.
When you’re ready to move forward, you can review the available raffle ticket order forms and select the format that matches your project.
Common Event Ticket Mistakes to Avoid
Even attractive tickets can create problems if the practical details are overlooked.
Mistake 1: Making the Design Too Busy
Too many fonts, colors, photos, patterns, and logos can make a ticket difficult to read.
Fix: Remove anything that does not help attendees understand the event or the ticket’s purpose.
Mistake 2: Using Tiny Text
Important information should not require attendees to zoom in or squint.
Fix: Test the physical ticket, not just the screen version.
Mistake 3: Forgetting the Venue or Date
This sounds obvious, but event details can change during planning.
Fix: Perform a final information audit immediately before printing.
Mistake 4: Ignoring the Ticket’s Physical Format
A beautiful design can fail if important information falls too close to a perforation, edge, or cut line.
Fix: Design according to the printer’s actual template.
Mistake 5: Treating Every Ticket as an Admission Ticket
Raffle tickets, admission tickets, donation records, and combination tickets serve different purposes.
Fix: Define the ticket’s function before choosing its format.
Mistake 6: Printing Without a Physical Proof
A screen cannot always reveal how a ticket will look when printed.
Fix: Print and inspect one sample before approving the full run.
Mistake 7: Forgetting Accessibility
For assigned-seat events covered by the ADA, ticket sales and accessible seating have specific requirements. Organizers should consider accessibility when planning the entire ticketing and event process.
Event Ticket Design Best Practices
Use these principles before approving your final ticket:
- Put the event name where it can be seen immediately.
- Make the date and time easy to locate.
- Keep venue information prominent.
- Use consistent event branding.
- Choose readable fonts.
- Maintain strong color contrast.
- Avoid unnecessary decoration.
- Use numbering when your event requires tracking.
- Use perforation when a physical stub serves a purpose.
- Proofread every detail.
- Print a physical test copy.
- Order enough tickets to cover realistic demand.
- Confirm production and shipping time before your event date.
- Keep a final approved copy of the ticket design for your records.
Printable Event Ticket Checklist
Before sending your tickets to print, use this quick checklist.
Content
- Event name is correct
- Date is correct
- Time is correct
- Venue is correct
- Ticket price is correct
- Seat or section information is correct
- Organization name is correct
- Website and contact information are correct
- Instructions are complete
- Sponsor names and logos are correct
Design
- Event branding is consistent
- Text is easy to read
- Colors have enough contrast
- Important information is easy to find
- Images are high enough quality
- The design is not overcrowded
- The ticket matches the intended event style
Printing
- Correct ticket size selected
- Correct template used
- Safe area checked
- Perforation position checked
- Numbering position checked
- Quantity confirmed
- Physical proof reviewed
- Delivery deadline confirmed
What Makes a Professional Ticket Look Professional?
Professional appearance usually comes from clarity and consistency, not from adding more graphics.
A polished ticket has a clear information hierarchy, readable typography, consistent branding, accurate details, clean printing, and a format that supports the way the event will actually operate.
For fundraising organizations, numbered and perforated tickets can also make distribution and drawing administration easier.
If you are comparing different ticket formats, take a look at the available raffle ticket samples to see how different sizes and layouts work in practice.
Printable Event Tickets for Fundraising Events
Tickets can serve several roles in a fundraising campaign.
An organization might use printed admission tickets for a dinner, sell separate raffle tickets during the event, and use digital registration for advance reservations.
That combination can work well because each ticket serves a different purpose.
If your event is primarily a fundraiser, plan the ticket format at the same time you plan your pricing, sales process, prize structure, and check-in procedure.
Organizations that need professionally produced raffle tickets can explore custom printed raffle tickets and select a format based on quantity, size, numbering, and perforation requirements.
How to Choose the Right Printing Option
Use this simple decision process:
Need a small number of basic tickets?
DIY printing may be sufficient.
Need hundreds or thousands of tickets?
Compare professional printing costs and production time.
Need sequential numbering?
Choose a printing process that can reliably produce consecutive numbers.
Need a tear-off stub?
Use a format designed for perforation.
Need a branded ticket?
Prepare your logo, colors, event information, and design requirements before ordering.
Need tickets quickly?
Check the printer’s current production and shipping schedule before placing your order.
Running a raffle?
Use a raffle-specific format rather than treating a standard admission ticket as a substitute.
For organizations ready to compare options, review the current raffle ticket pricing and then use the raffle ticket order forms to move forward with the appropriate format.
Final Takeaway
The best printable event tickets combine attractive design with practical information.
Start with the purpose of the ticket, decide what attendees and event staff need to know, then build a simple layout around those requirements. Use your event colors and branding consistently, keep essential information easy to read, proof every detail, and test the physical ticket before producing the full quantity.
If your event includes a fundraiser or raffle, pay particular attention to numbering, perforation, ticket size, and the way tickets will be distributed and collected.
For organizations that need professionally produced fundraising or raffle tickets, Raffles For Less offers custom options, multiple sizes, templates, consecutive numbering, perforation, and printing options. Review the available formats, compare current raffle ticket pricing, and choose the ticket setup that fits your event.
FAQs About Printable Event Tickets
1. What are printable event tickets?
Printable event tickets are physical tickets that can be printed and distributed to attendees. They typically include the event name, date, time, venue, admission details, and sometimes seat numbers, ticket numbers, or tear-off stubs.
2. Can I make printable event tickets at home?
Yes. Home printing can work well for small quantities and simple designs. You need appropriate paper, a printer, design software or a suitable template, and enough time to print, cut, and organize the tickets.
3. What should I put on an event ticket?
Include the event name, date, time, venue, admission information, price when applicable, and organization details. Assigned-seat events should include seat information. Fundraising or raffle tickets may also need numbering, a stub, rules, or purchaser information.
4. Are printable tickets better than digital event tickets?
Neither format is automatically better. Printable tickets work well for physical check-in, keepsakes, in-person sales, and certain fundraising formats. Digital tickets can be convenient for online registration and mobile check-in.
5. What size should an event ticket be?
The best size depends on how much information the ticket needs to contain and how it will be used. Simple admission tickets can use compact formats, while tickets requiring additional information may benefit from a larger format.
6. Should event tickets be numbered?
Numbering is useful when tickets need to be tracked individually. It is particularly important for raffle tickets because each entry should be distinguishable. Numbering can also help organizations monitor ticket distribution.
7. Do printable event tickets need a perforated stub?
Not always. A perforated stub is useful when one portion of the ticket needs to be collected while the attendee keeps the other portion. This is common with raffle tickets and some physical check-in systems.
8. How do I make event tickets look professional?
Use a simple layout, readable typography, consistent branding, strong contrast, accurate information, and high-quality images. Avoid overcrowding the ticket with decorative elements and print a physical proof before producing the complete order.
9. Can printable tickets include QR codes?
Yes. A QR code can be added when it provides a useful function, such as linking to event information, registration details, a website, or a digital check-in system.
10. Can I use the same ticket for admission and a raffle?
Yes, if the event structure supports it. A combination ticket can provide event admission while also serving as an entry into a drawing. Make the two functions clear so attendees and event staff understand how the ticket works.
11. When should I order printed event tickets?
Order far enough ahead to allow for design, proofing, production, shipping, and unexpected delays. Check your printer’s current production and shipping schedule before committing to an event date.
12. Where can I get custom printed tickets for a fundraiser?
For fundraising events that require numbered, perforated tickets, compare professional printers based on size options, design support, numbering, perforation, quantity, turnaround time, and total cost. Raffles For Less provides custom raffle ticket printing for U.S. organizations.